Sunday, July 27, 2014

Perfectly Painted Plant Pot

Our lovely realtor connected us with a woman who was downsizing. She had some seriously cool stuff, so we bought the whole lot for our booth and some for our house.
 
I really loved a planter that we got from her, but the colors totally clashed with our house. I remembered that luckily, the previous owners had left buckets of paint that are the same colors as the house! I decided to paint the metal box the blue accent color that we have on our house and the actual planter the same color as our house. Then I set it up outside:
I really liked the way it turned out and we planted some herbs in there! Speaking of porch projects, I have another one to share with you soon, plus another house project!

Friday, June 20, 2014

#Read26Indy Update

Happy middle of June to everyone! The middle of June means sun, fun, swimming, barbecues, etc. It also means that I am halfway done with my #Read26Indy challenge! I thought I would give everyone an update on the books I read and some upcoming ones I will be reading beachside on vacation :)
Here is the list:
  • The Interestings by Meg Wolitzer
  • Eleanor and Park by Rainbow Rowell
  • Dark Places by Gillian Flynn
  • A Long Way Down by Nick Hornby
  • The Rosie Project by Graeme Simsion
  • Z: A Novel of Zelda Fitzgerald by Therese Anne Fowler
  • This Is Where I Leave You by Jonathan Trooper
  • Noggin by John Corey Whaley
  • Bossypants by Tina Fey
  • Astonish Me by Maggie Shipstead
  • Trash by Andy Mulligan
  • Bringing ABA Into Your Inclusive Classroom: A Guide to Improving Outcomes for Students with Autism Spectrum Disorders by Debra Leach (for school)
I thought I would pick five of my favorites to spotlight. If you click on the pictures, it will link you to the Goodreads page with a synopsis of the book:

https://www.goodreads.com/book/show/15795357-eleanor-and-park?from_search=true

 Eleanor and Park is a great YA book that is a quick and satisfying read!

https://www.goodreads.com/book/show/16181775-the-rosie-project?from_search=true
If you like the Big Bang Theory (which who doesn't?) you will like this book. I swear a nice Sheldon Cooper narrates it. This book is equal parts funny and awesome.

https://www.goodreads.com/book/show/6224935-this-is-where-i-leave-you?from_search=true 
In case you haven't heard, this hilarious book about true family relationships is going to be a movie with Tina Fey and Jason Bateman! 

https://www.goodreads.com/book/show/18049084-noggin?from_search=true
This other YA book has a crazy premise, but the narrator is hilarious and it holds true to real life experiences. I was skeptical at first, but ended up loving this book!

https://www.goodreads.com/book/show/7740772-trash?from_search=true
I must love YA books because this one captured my heart as well! It is a great story that shows hints of poverty in our world. It is a thriller and will keep your attention!
In addition, here is what I'm currently reading and plan to read in the future:
  •  Let's Explore Diabetes with Owls by David Sedaris (currently reading)
  • The Vacationers by Emma Straub (perfect for my beach vacation
  • The Goldfinch by Donna Tartt
  • One Summer by Bill Bryson
  • Middlemarch by George Eliot (a classic)
  • My Life in Middlemarch (a great one to follow up Middlemarch)
I thought this challenge would be super hard, and it is some weeks, but mostly I have found it enriching. I found that if I substitute TV time or read a half hour before bed, I can do it. I am always open to suggestions for books! Stay tuned for a house project next on the blog!


Sunday, June 8, 2014

Let Me Updgrade You

 Do you remember this desk? Well we decided to upgrade it and paint it teal. We knew the gold would pop with the teal. I loved the open shelving of this desk before, but I feel like the colors just set it off. Here are the after pictures:


In the spirit of open shelved desks painted a shade of blue, here is a before picture of another desk we upgraded:
And as I am sure you guessed, here is the after picture of the desk painted blue in the booth:
For the finale, here is what the booth looks like as of recent. We kind of have a theme going on here (wink wink):
Stay tuned for some fun house projects, both inside and outside. We have been little busy bees working on our house :)


Wednesday, May 28, 2014

What's Mine Is Yours

After we installed the lockers, I was trolling one of my favorite blogs, isuwanee. I came across these and knew instantly that they would be perfect for the lockers and that I just HAD to have them. So after some furious button clicking, and a few days of waiting for them (impatiently), they arrived! Here is what they look like on the lockers:
 I love them even more on the lockers! They are so kitschy and fun. Stay tuned for a booth update and then some fun house projects that we have been working very hard on!

Sunday, May 4, 2014

All locked up

The back part of our house is half eat-in-kitchen and half mud room. Or at least that's what we want it to be. We have a tall eat-in table with our tall IKEA stools from our old house (they were with the drafting table). However, we just kept piling things on top of the table. Like jackets. And coats. And jacket coats. I finally decided that something needed to be done. So I decided to start on a project that was sitting in our garage: lockers.

When we moved in, my mom (a design genius) said that we should put lockers in on one side to use part of the back as a mud room. I loved the idea and kept seeing lockers popping up in blogs and in cool shops. Then, I saw a post on the Indy Eastside Yard Sale for lockers and commented right away. We got three lockers for a steal! The only catch was that they were built in and lacked two walls. Not to mention that they were PEACH. We decided to start by spray painting them teal:
We measured and found out that we could only use two. I decided to use the two with outside walls and just put them together. Then, we would sell just the door of the other one (since it would have 0 sides) in our booth. We bought a socket wrench and unscrewed one locker and screwed in another.
Then, Kyle and his brother moved them inside and screwed them to the wall. Here are the after photos:
I love the color and how they fit in the space! We decided that we are going to paint the tall table teal! Stay tuned for those pictures and a booth update!


Sunday, April 20, 2014

S'more Fun

Last weekend, my friend Allie had a bunch of people over for Fire Pit Friday. Every other Friday, we will have a get together and rotate houses. I decided to bring s'mores to the shindig because every good fire pit needs s'mores. Kyle and I went to CVS because it is super close to our house. Much to our dismay, they didn't have marshmallows. That's when I had a brillant idea. I was going to use peeps instead of marshmallows. I mean when you think about it, they are basically and upgraded version of a marshmallow. Here are my supplies:
After I had my hotdog with ketchup and siracha (yum), I got my s'more ready:
I roasted the peep like a marshmallow, just for a little shorter time. I was skeptical, but they were SO good! Here is a little fire fun:
Now you know what to do with all of those leftover peeps your grandma gave you for Easter :) Stay tuned for a house project!

Sunday, April 6, 2014

Hypnotic Headboard

When we moved into our new house I knew there were some rooms I wanted to paint. One of those rooms was the bedroom. I kept seeing navy rooms on 
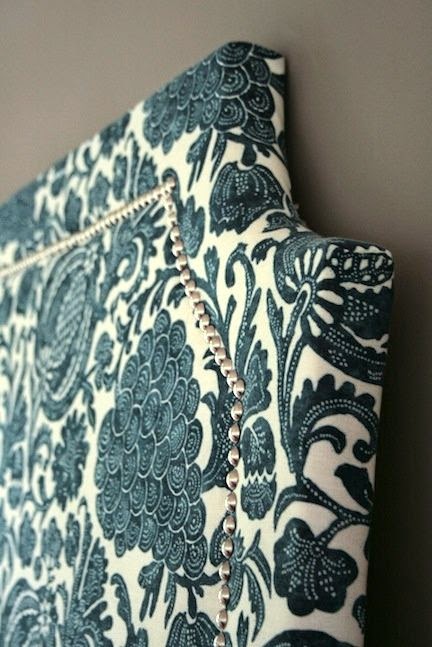
Pinterest and knew I wanted to go with navy for our master bedroom. Since our last bedroom was painted yellow, this was a drastic change for us. Therefore, we had to rethink some of our furniture choices for the bedroom. The headboard we have was given to me long ago and I felt it was time for a change. So I fired up Pinterest and went searching for DIY headboard projects. Here is the inspiration I found for my headboard:

http://www.pinterest.com/pin/186406872051074946/

Now that you've seen the inspiration, let's get started with the tutorial:

What You'll Need:
Headboard base
Batting (from the fabric store)
Fabric
Upholstery Tacks
Hammer
Staple Gun (from local hardware store)
Staples
Scissors

Directions:
1. Measure your headboard. I measured mine at two yards for width.
2. Go to the fabric store and pick out your fabric. Get batting and upholstery tacks. The best kind of tacks are the ones that are in a strip (more on that later).
3. Lay out your batting on the floor and lay your headboard on top:
4. Fold the batting over the headboard and start stapling. In some areas, you may have to cut the batting to help it fold over correctly depending upon the shape of your headboard.
5. Once you're done stapling all of the batting and cutting off excess, stand the headboard up again. Lay out your fabric as straight as possible on the floor (you may have to iron it before to get out all of the wrinkles). Lightly lay the headboard onto the fabric, making sure the fabric stays straight.
6. Start stapling the fabric to the batting and headboard. You  might have to cut the fabric, like you did the batting.

7. Once you are done stapling the fabric, stand it up and flip it over. Get ready to put in the upholstery tacks!
It is also really important to have a super cute helper :)
8. Get out your strip of upholstery tack fronts and your package of upholstery tacks. It is easiest to get this strip that is fake tack heads with a spot to hammer in a real upholstery tack about every fifth one. They usually come with upholstery tacks to hammer in as well! Put in one upholstery tack to start the strip.
9. Keep nailing in the upholstery tacks until you get to the where you want to stop and cut it. Then, go down the headboard with the strip of tacks.
10. Attach the headboard to the bedframe and enjoy! Here are my after pictures:

I love how it turned out and I think it is a wow-factor in the room! I was afraid that it would be difficult, but it was easier than I expected. The surprise from this post is that my next post will share the entire master bedroom, including wider shots of the headboard! Stay tuned for that post :)


Wednesday, March 26, 2014

Open and Airy

Open and airy. Isn't that what we are all waiting for? Those wonderful spring days when we can open the windows and let our house just be one big open and airy place. Well I am channeling that feeling with a mid-century modern desk that we put in the booth. The left side of the desk has open shelving that I think is so modern and wonderful. It makes me pine for spring and summer even more. Here are pictures of the desk:
I love the original handles and the gold detailing in front of the shelves.
I think I am a sucker for that open shelving. If we had room, I would totally keep this. We also put a table in the booth that the old homeowners left:
And lastly, here is an overall picture of what the booth looks like right now:
Sorry for the delay in posts. I have been focusing most of my energy on wrapping up the grading period at school and surviving until spring break. Now that I'm on spring break (woohoo!) I have really been focusing on getting the house together. So stay tuned for some fun projects that I have been working on for the house!

Saturday, March 1, 2014

Pardon Our Mess

So I promised you guys a house update. I am here to deliver my promise. However, pardon our mess. We have been moving our stuff in and are by no means done with the house. Our house is in Historic Irvington, where we got married. It is an old Victorian house that was built in the late 1800's. It is about a 10 minute walk to downtown Irvington! We love the new location, especially since it cut my commute from an hour to 20 minutes. Let's start with the outside:
Now for the living room. We were in the middle of painting when I took this picture. The teal is what the new color will be. Here is what it looks like:
Obviously the living room is fully furnished. The living room is right off the entry way of the front door:

The entry way also has the stairs that lead upstairs:
The master bedroom, a spare bedroom, and the turret room are upstairs. Right now the master and spare bedroom are a total mess. So I'm not going to show them today. However, here is the turret room:
Off of the living room and the kitchen is the dining room. The dining room is also messy and in the middle of being painted, so bear with me. Here are the in progress pictures:
 Off of the dining room and the entry way hallway is the kitchen. Here are some pictures of the kitchen:
The painted floor that you see used to be a butler's pantry. We were really excited that we got to keep the appliances, including the awesome gas stove:
At the back of the kitchen is an eat-in area and mud room area that has a door to our back yard (that is fenced in for the dogs):
That area has a bathroom with a closet that has some pretty cool doors:
That's it for this round. I promise when we get everything situated and painted I will share a final tour with you. In the meantime, I will have a booth update soon. I hoped you enjoyed our new house as much as we do!